Getting started with Data Hooks®
Flatfile's Data Hooks® are a useful data healing element to re-format, validate and/or correct data automatically during the import without the user having to correct manually. When used properly, they can be used for things like automatically reformatting area codes or country codes, removing special characters, validating emails against external data, and really anything else you can code up. Data Hooks® are the most powerful data healing element to date within Flatfile. There are two hooks that are available, field hooks (AKA column hooks) and record hooks (AKA row hooks).
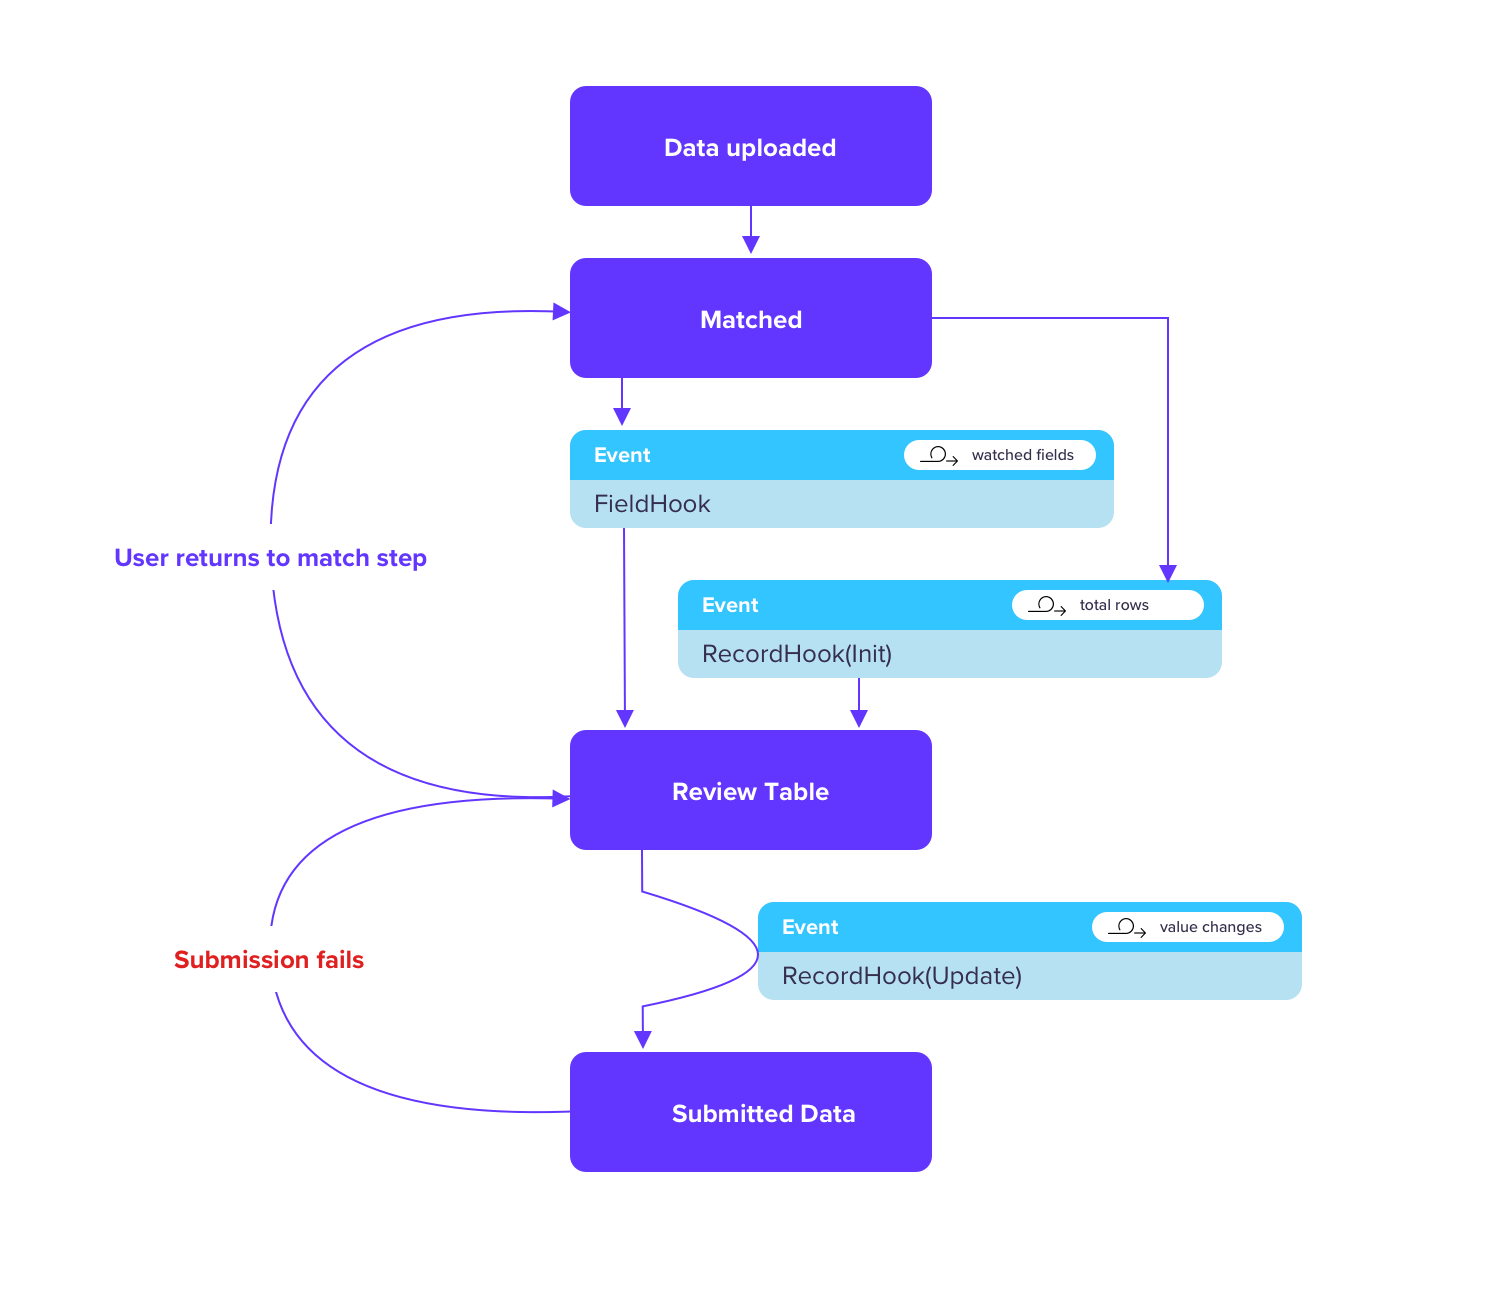
Before beginning, there are a couple considerations to be made when choosing which type of hook to use and how to use it, and those revolve around the order and event flow of the hooks. Below is a helpful diagram that shows the general flow for Flatfile, but it should be noted that fieldHooks runs first and only runs once after the 'matching' stage. After the field hooks run, onRecordInit will run, and then as records are updated, onRecordChange hooks will run.
Field Hooks
fieldHooks: Record<string, FieldHookCallback>
Field hooks run validation on a particular field (column) of data at the beginning of the matching stage. These hooks are run before record hooks and will only run once during the import process. These are best used to bulk edit a field or use an outside data source for validation. For example, say you want to verify the email addresses in a file are not already in your database, you could grab all the values in the column within a field hook, send them to your server and validate against your server and send back an error message with any that already exist in your system to display for the user.
In reference to FlatfileFileImporter.registerFieldHook(), the Flatfile Ember component has a fieldHooks property that accepts callback functions to execute on the given fields. Each callback function you provide will be registered to the specified field within the callback. You cannot give multiple fields per callback, so each field will need to have its own callback function. Below will help to visualize the data structures for both the data that is available within the callback functions and what the expected return data structure should look like.
| Name | |
|---|---|
| John Doe | john@doe.com |
| Jane Doe | jane@doe.com |
| Steve Smith | steve@something.com |
| Wayne Jones | wayne@something.com |
In the above scenario, let's say we are sending the values to our server and returning an error for any emails that are already in the database. Let's assume that John and Steve's emails are already in the system. When we return our response, we would need to provide any array with each item in the array being an array that has the record and index. Notice in the below example that when being passed back, the record becomes an object that has a value and/or info key. We can use these keys to either update the value or provide an error or warning to the user.
// values passed into the callback function
[
  ["john@doe.come", 1],
  ["jane@doe.com", 2],
  ["steve@something.com", 3],
  ["wayne@something.com", 4],
][
  // what should be passed back in this case
  ([
    {
      value: "john@doe.com", // not required if not changing value
      info: [
        {
          message: "Error message goes here",
          level: "info", // should be 'info', 'warning' or 'error'
        },
      ],
    },
    1,
  ],
  [
    {
      value: "steve@something.com", // not required if not changing value
      info: [
        {
          message: "Error message goes here",
          level: "info", // should be 'info', 'warning' or 'error'
        },
      ],
    },
    3,
  ])
];
Basic Example
In the below example, we will put it into action. We will simply take in an email field and add " added from the field hook" so that if you run the code, you can see it work.
fieldHooks = {
  email: (values) => {
    return values.map(([item, index]) => [
      { value: item + "@", info: [{ message: "added @ after the email", level: "warning" }] },
      index,
    ]);
  },
};
Field Hooks additional notes:
- While we use the
valuekey in each of the above examples, if you aren't changing the original value, this is not required, and we recommend to not include it in your returned values. - We also use the
infoarray withmessageandlevelin all of the examples above to provide a custom error message. This is not required to be given, however, please note that if you choose not to use this, there is still a standard "info" level message letting the user know that the data was automatically formatted. - You can also call multiple field hooks per import. In order to do this, you would just need to add a new key that corresponds to the field value on the object and have another callback function as the key's value.
- If you have registered the field hook and are not seeing the expected results in the import process, please check to make sure that the field name in your config matches the field provided in the
fieldHooksprop and also that the returned data structure is correct.
Record Hooks
Record hooks in the Ember component are split into separate Input's, one being [onRecordInit] and the other [onRecordChange]. Both types are used in the same way, but when they actually occur is different. In the flow chart above, you'll see that the onRecordInit hooks are going to run on every record at the initialization of the review step while the onRecordChange will run on only the record that changes as it happens in the review step. For this reason, we recommend that if you are working with an external datasource or external validation of some kind, you should use fieldHooks to validate on initialization and then onRecordChange to make sure data remains that way as the records change.
Record hooks are processed in batches. This means that if you need to do something sequentially, you should rely on the index as the source of truth for the sequence.
<FlatfileButton
  @licenseKey="License Key Here"
  @customer={{hash userId="12345"}}
  @settings={{hash
    type="Contract"
    fields=(array (hash label="Full Name" key="name") (hash label="Email" key="name"))
  }}
  @onRecordInit={{this.onRecordInit}}
  @onRecordChange={{this.onRecordChange}}
>
  Import Contacts
</FlatfileButton>
import Controller from '@ember/controller';

export default class extends Controller {
  onRecordInit(record, index) {
    return {
      email: {
        value: record.email + '@',
        info: [{ message: 'added @ on init', level: 'info' }]
      }
    };
  }

  @onRecordChange(record, index) {
    return {
      email: {
        value: record.email + '#',
        info: [{ message: 'added # on change', level: 'warning' }]
      }
    };
  }