Documentation Index
Fetch the complete documentation index at: https://flatfile.com/docs/llms.txt
Use this file to discover all available pages before exploring further.
An Action is a code-based operation that runs where that Action is mounted. Actions run when a user clicks the corresponding user prompt in Flatfile.
Overview
When an Action is triggered, it creates a Job that your application can listen for and respond to.
Given that Actions are powered by Jobs, the Jobs Lifecycle pertains to Actions as well. This means that you can update progress values/messages while an Action is processing, and when it’s done you can provide an Outcome, which allows you to show a success message, automatically download a generated file, or forward the user to a generated Document.
Actions are mounted on resources like Workbooks, Sheets, Fields, Documents, and Files.
Generally, Workbook, Sheet, Field, and Document Actions are configured within a Blueprint object, while File Actions are appended to the file during the upload process. Alternatively, Actions can be mounted to any of these resources via API in a Listener.
Sheet Actions can be executed on the entire Sheet, for a filtered view of the Sheet, or selectively for the chosen records. See Sheet Action Execution Modes for details on how actions handle different data selections.
In these examples, we’ll show the full Job Listener lifecycle implementation, complete with ack to acknowledge the job, update to update the job’s progress, and complete or fail to complete or fail the job.To make this simpler in practice, we provide a plugin called Job Handler that handles the job lifecycle for you. This plugin works by listening to the job:ready event and executing the handler callback, even catching errors to fail the job. There is also an optional tick function which allows you to update the Job’s progress.For example: With the Job Handler plugin, the 35-line File Action Listener defined below would be implemented simply as:listener.use(jobHandler("file:logFileContents", async ({ context: { fileId, jobId } }, tick) => {
const file = await api.files.get(fileId);
tick(10, "Getting started.");
console.log({ file });
tick(90, "Logged.");
return {
outcome: {
message: "Logging file contents is complete.",
}
}
}));
Workbook Actions
Once a user has extracted and mapped data into a Workbook, it may be more efficient to run an operation on the entire dataset rather than making atomic transformations at the record- or field-level.
For example:
- Sending a webhook that notifies your API of the data’s readiness
- Populating a Sheet with data from another source
- Adding two different fields together after a user review’s initial validation checks
- Moving valid data from an editable Sheet to a read-only Sheet
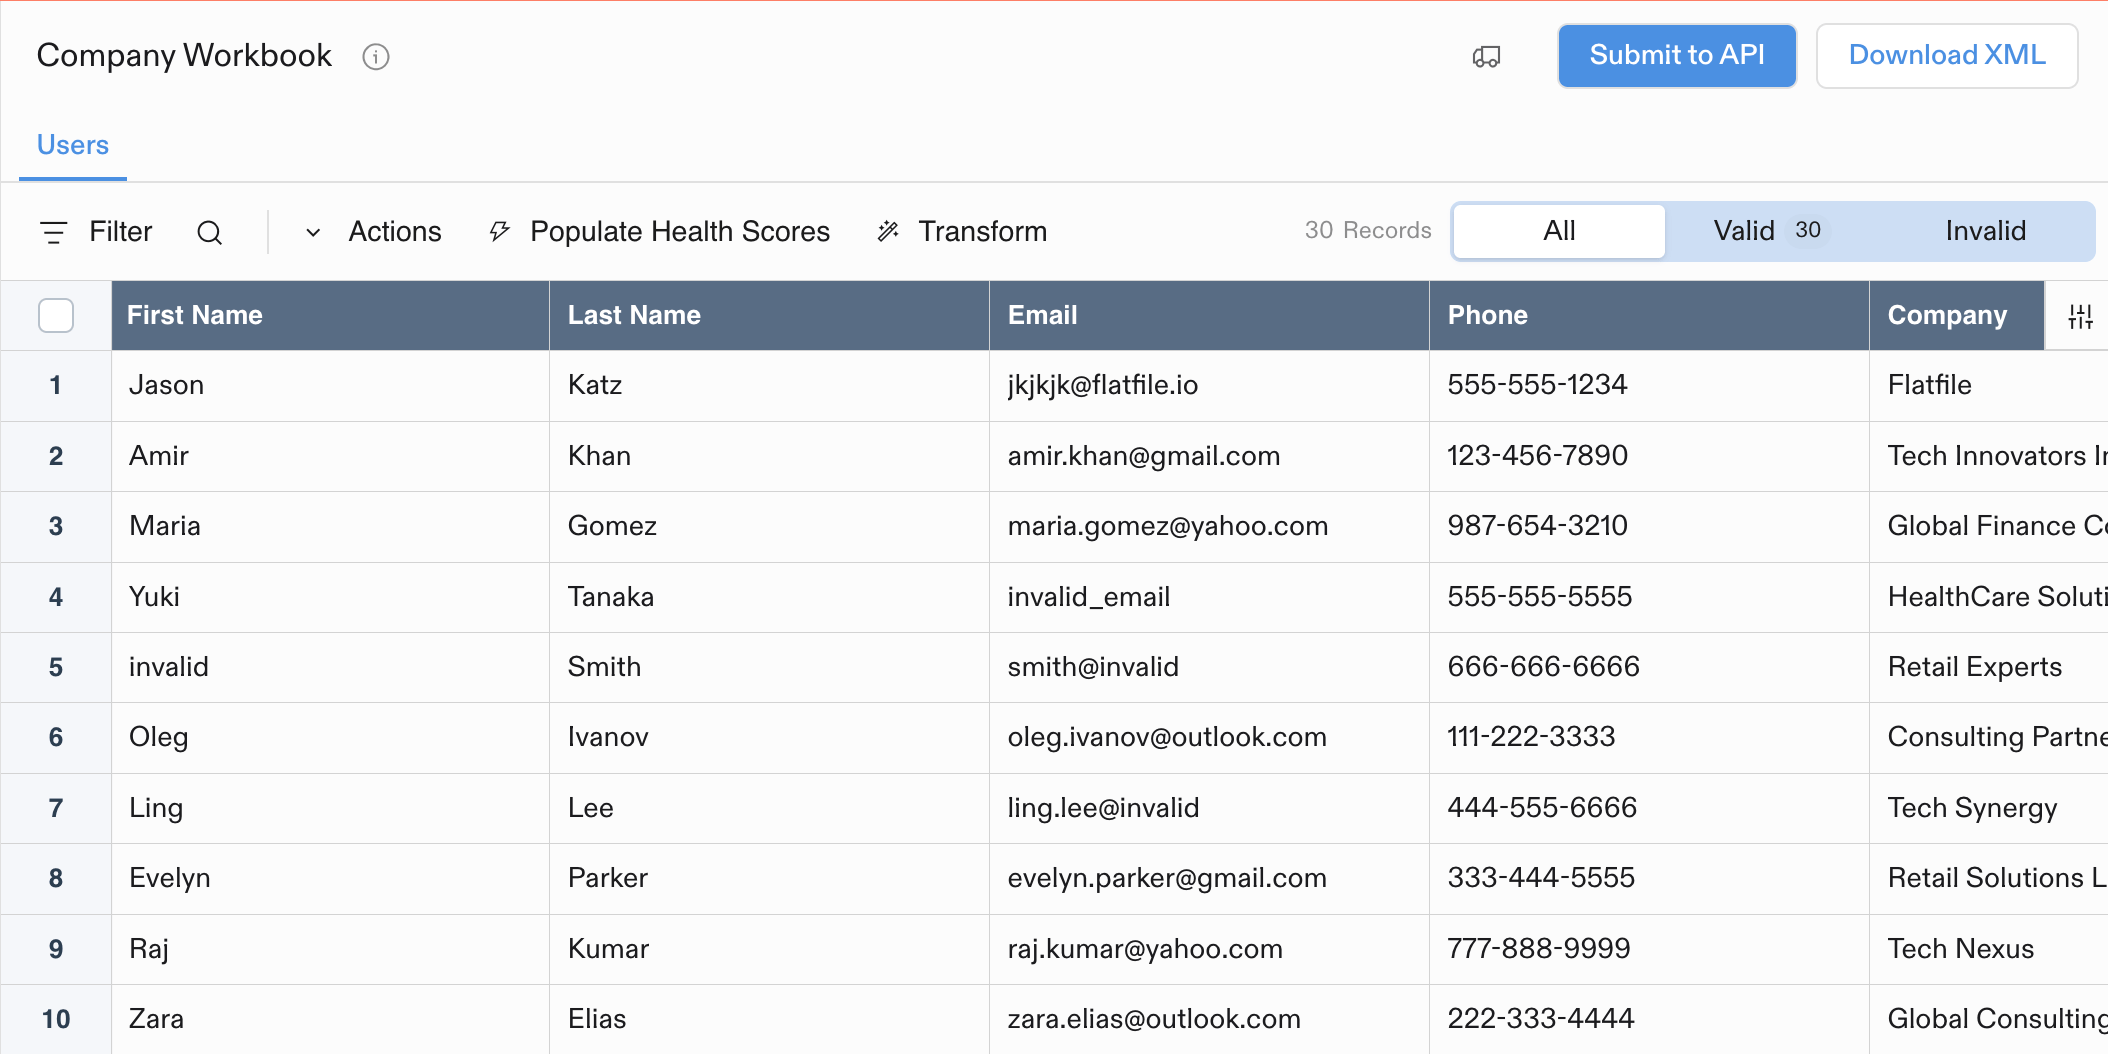
Workbook-mounted actions are represented as buttons in the top right of the Workbook.
Usage
If you configure primary: true on an Action, its button will be highlighted in the Workbook.
If you configure trackChanges: true, it will disable your actions until all commits are complete (usually data hooks).
Blueprint Configuration
First, configure your action in your Blueprint:
// Add this to your workbook configuration
actions: [
  {
    operation: "downloadXML",
    mode: "background",
    label: "Download XML",
    type: "string",
    description: "Generates and downloads an XML file with all the users in the workbook",
    primary: false,
  },
  {
    operation: "submitToAPI",
    mode: "background",
    label: "Submit to API",
    type: "string",
    description: "Submits the users to our API",
    primary: true,
  },
],
settings: {
  trackChanges: true,
}
Listener Implementation
Next, create a listener to handle the job:ready event for your action.
listener.on(
  "job:ready",
  { job: "workbook:submitToAPI" },
  async (event) => {
    const { jobId, workbookId } = event.context;
    const { data: workbook } = await api.workbooks.get(workbookId);
    const { data: workbookSheets } = await api.sheets.list({ workbookId });

    // Collect all sheet data
    const sheets = [];
    for (const [_, element] of workbookSheets.entries()) {
      const { data: records } = await api.records.get(element.id);
      sheets.push({
        ...element,
        ...records,
      });
    }

    try {
      // Acknowledge the job start
      await api.jobs.ack(jobId, {
        info: "Starting job to submit action to webhook",
        progress: 10,
      });

      // Replace with your actual webhook URL
      const webhookReceiver = "https://your-app.com/webhook/flatfile";

      // Submit data to external system
      const response = await fetch(webhookReceiver, {
        method: "POST",
        headers: {
          "Content-Type": "application/json",
        },
        body: JSON.stringify({
          workbook: {
            ...workbook,
            sheets,
          },
        }),
      });

      if (response.status === 200) {
        await api.jobs.complete(jobId, {
          outcome: {
            message: `Data was successfully submitted to ${webhookReceiver}.`,
          },
        });
      } else {
        throw new Error("Failed to submit data to webhook");
      }
    } catch (error) {
      console.error(error);
      await api.jobs.fail(jobId, {
        outcome: {
          message: "This job failed. Check your webhook URL and try again.",
        },
      });
    }
  }
);
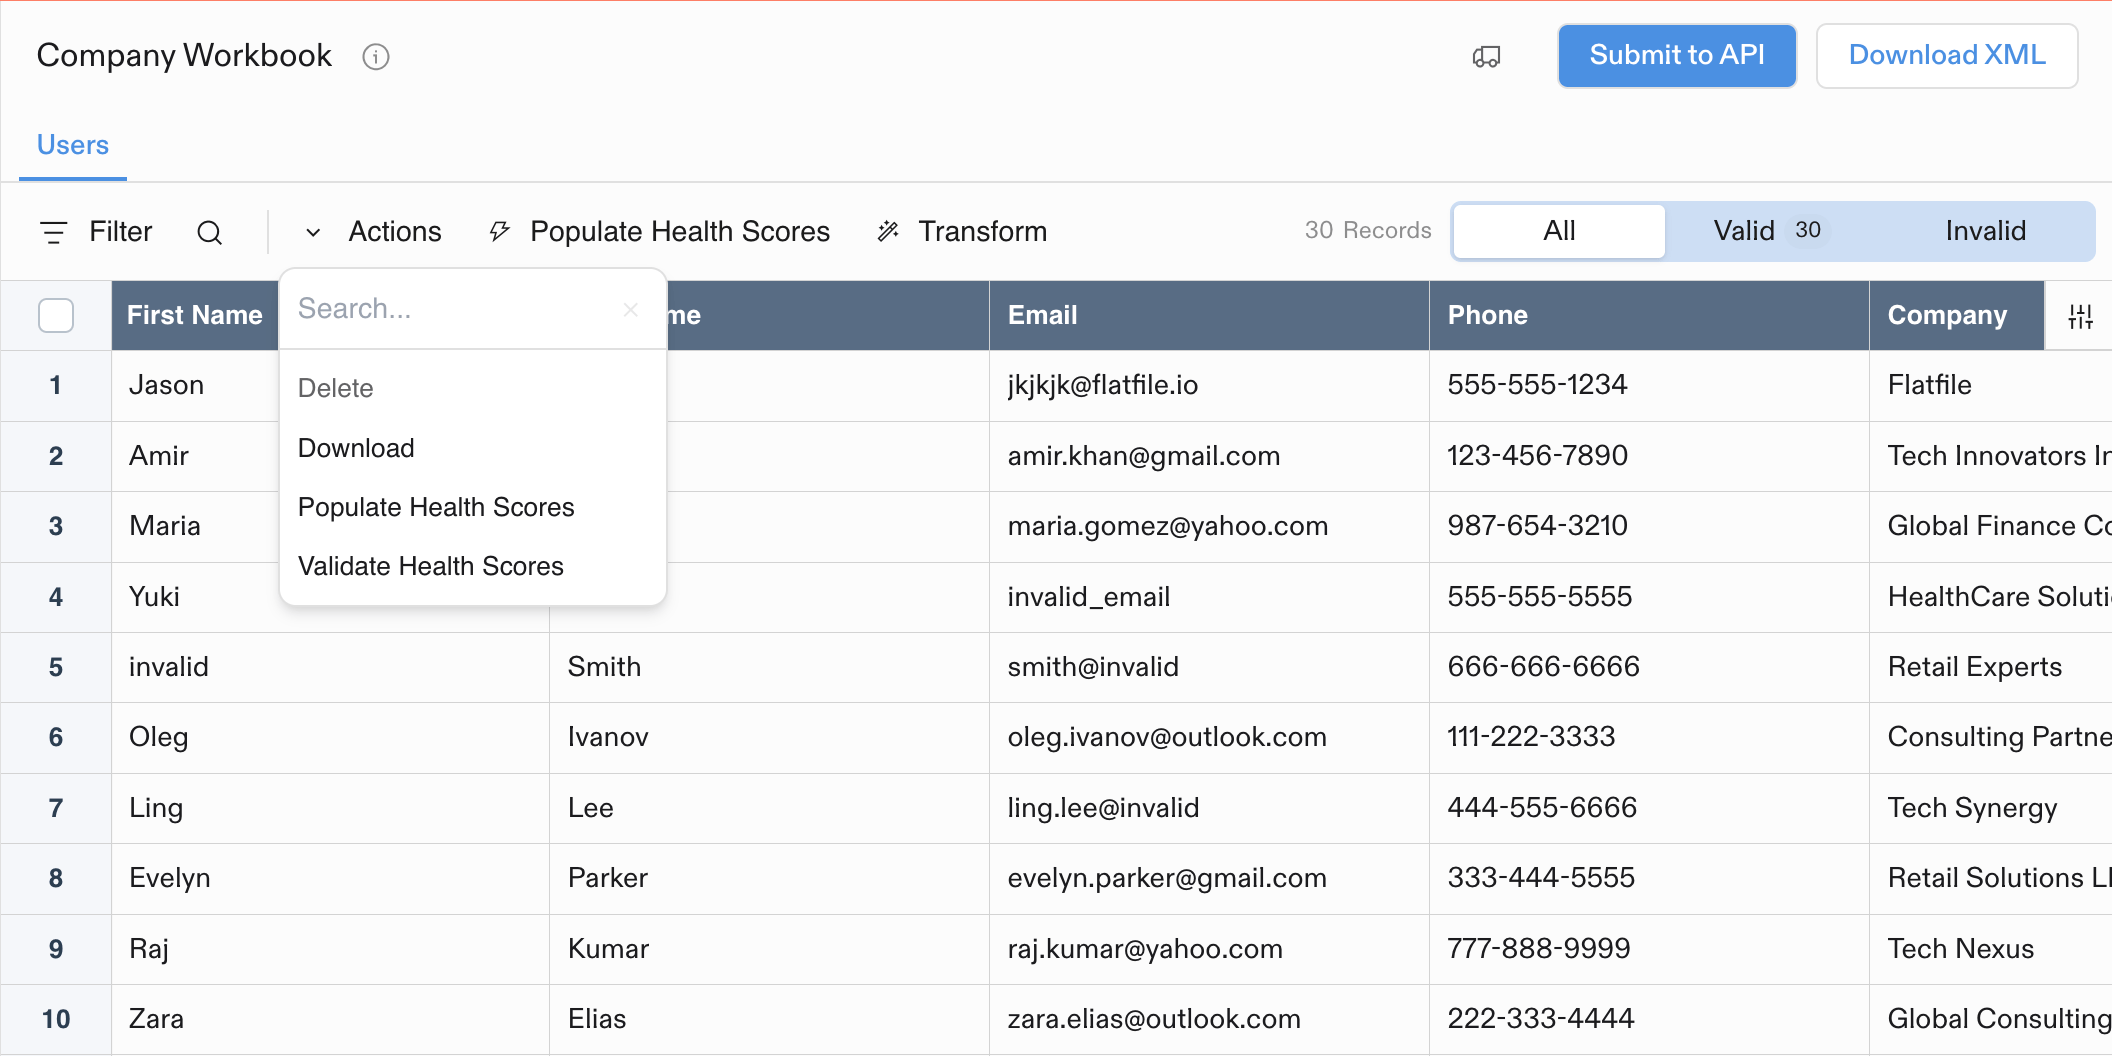
Sheet Actions
Each Sheet has built-in Actions like download.
Sheet-mounted actions are represented as a dropdown in the toolbar of the Sheet.
Usage
If you configure primary: true on an Action, it creates a top-level button as well as placing it in the dropdown menu.
Blueprint Configuration
First, configure your action on your Blueprint. Add the action configuration to your sheet definition:
sheets : [
  {
    name: "Users",
    actions: [
      {
        operation: "populateHealthScores",
        mode: "background",
        label: "Populate Health Scores",
        type: "string",
        description: "Populate health scores for all users",
        primary: true,
      },
      {
        operation: "validateHealthScores",
        mode: "background",
        label: "Validate Health Scores",
        type: "string",
        description: "Validate health scores for all users",
        primary: false,
      },
    ]
  }
]
Listener Implementation
Next, listen for a job:ready and filter on the domain (sheet) and the operation of where the action was placed. Be sure to complete the job when it’s done.
listener.on(
  "job:ready",
  { job: "sheet:populateHealthScores" },
  async ({ context: { jobId } }) => {
    try {
      await api.jobs.ack(jobId, {
        info: "Populating health scores...",
        progress: 10,
        estimatedCompletionAt: new Date("Tue Aug 23 2023 16:19:42 GMT-0700"),
      });

      // Populate health scores for all users
      // Implementation logic here

      await api.jobs.complete(jobId, {
        info: "Health scores populated successfully.",
      });
    } catch (error) {
      console.error("Error:", error.stack);

      await api.jobs.fail(jobId, {
        info: "Failed to populate health scores.",
      });
    }
  }
);
Sheet Action Execution Modes
Sheet Actions are powerful because they can operate on different subsets of data within a sheet. When a Sheet Action is triggered, it automatically receives context about what data should be processed based on the user’s current view and selections.
How Sheet Actions Handle Data Context
When a Sheet Action job is created, it receives a query object in the job’s subject that specifies which records to process:
// Job subject structure for Sheet Actions
{
  type: "collection",
  resource: string,              // Usually sheetId or "records"
  query: {
    filter: "valid" | "error" | "all" | "none",  // Filter type
    filterField: string,         // Field to filter on (optional)
    searchField: string,         // Field to search in (optional)
    searchValue: string,         // Search term (optional)
    q: string,                   // FFQL (Flatfile Query Language) query (optional)
    ids: string[]               // Record IDs - INCLUDE when no filter, EXCLUDE when filter applied
  },
  params: {
    sheetId: string,            // Always present for sheet actions
    // Additional params depending on action type
  }
}
Three Execution Contexts
1. Entire Sheet (No Filter, No Selection)
- Processes all records in the sheet
query.filter is "all" or undefined- No
ids or exceptions arrays
2. Filtered View
- Processes only records matching the current filter
query.filter indicates the filter type:
"valid" - Only valid records (no errors)"error" - Only records with validation errors- Custom filters if applied
- May include search parameters if user has searched
- May include FFQL queries via the
q parameter for advanced filtering
3. Selected Records
- Processes only user-selected records
- When no other filters applied:
query.ids contains specific record IDs to INCLUDE
- When filters are applied:
query.ids contains record IDs to EXCLUDE from the filtered results
Implementation Example
listener.on(
  "job:ready",
  { job: "sheet:processData" },
  async (event) => {
    const { jobId, sheetId } = event.context;

    // Get the job to access the query context
    const { data: job } = await api.jobs.get(jobId);
    const query = job.subject?.query || {};

    // Pass the query directly to the records API
    // The API handles the inclusion/exclusion logic for ids based on filters
    const { data: records } = await api.records.get(sheetId, {
      ...query  // Includes filter, ids, searchField, searchValue, etc.
    });

    console.log(`Processing ${records.length} records`);
    console.log(`Query context:`, query);

    // Process the records
    for (const record of records) {
      // Your processing logic here...
    }

    await api.jobs.complete(jobId, {
      outcome: {
        message: `Successfully processed ${records.length} records`,
      },
    });
  }
);
Built-in Action Examples
Built-in actions like Delete and Download demonstrate these execution modes:
- Delete All - Removes all records when no selection/filter
- Delete Selected - Removes only selected records
- Delete Valid/Invalid - Removes records matching the current filter
- Download Filtered - Exports only records matching current view
Your custom Sheet Actions automatically inherit this same context-aware behavior.
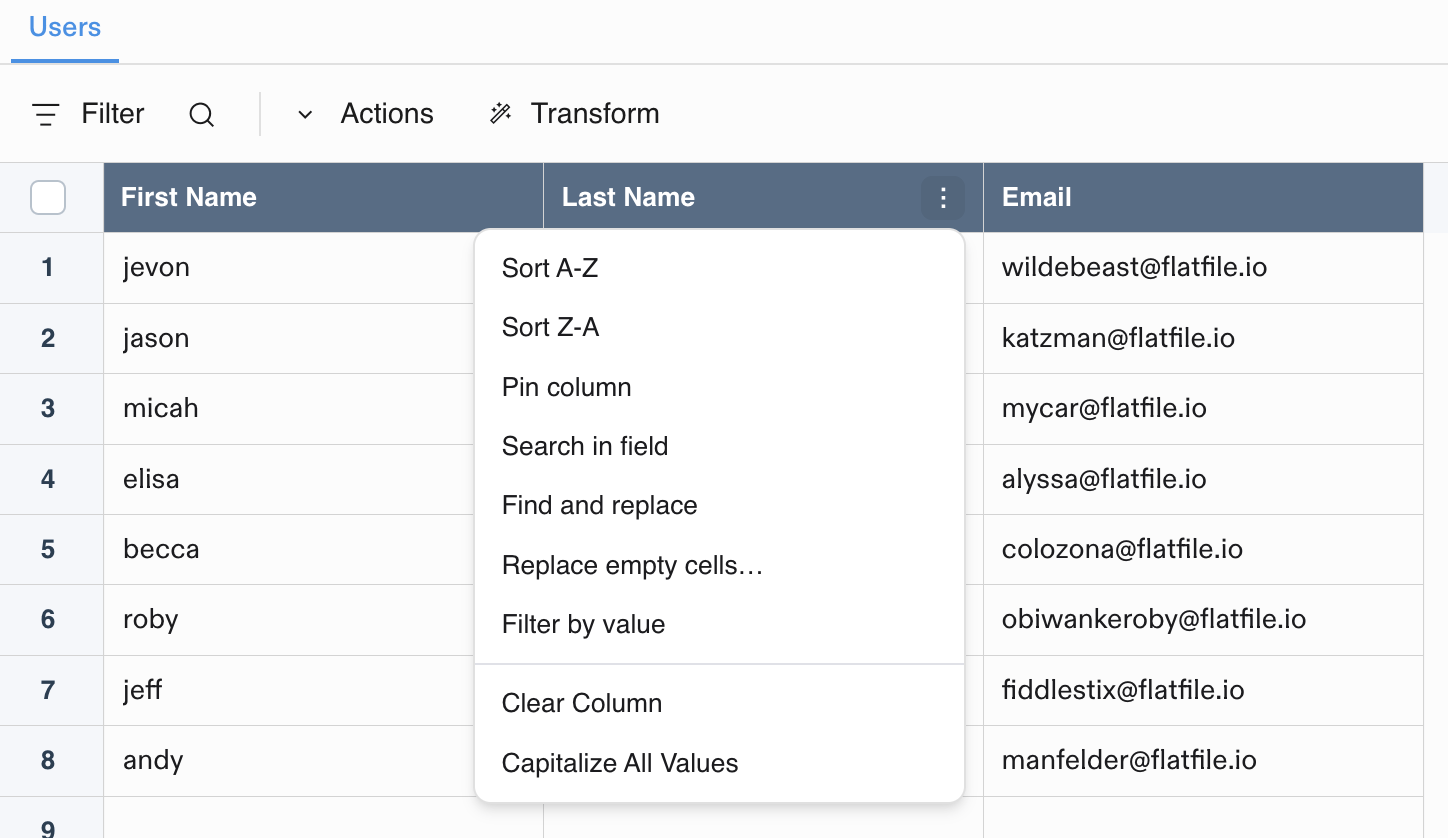
Field Actions
Field-mounted actions are operations that can be performed on individual columns/fields within a Sheet. They appear as options in the dropdown menu when you click on a column header.
Field actions are particularly useful for:
- Column-specific data transformations (e.g., capitalizing all values in a name field)
- Field-level validation operations
- Data formatting specific to a column type
- Column-specific cleanup operations
Usage
The primary property does not affect the UI for Field actions.
Note: Field Actions are essentially an extension of Sheet actions - therefore their operation names are prefixed with sheet:, and the column key is available in the job data.
Blueprint Configuration
First, configure your field action in your Blueprint by adding it to the field definition:
// Add this to your field configuration within a sheet
{
  key: "firstName",
  type: "string",
  label: "First Name",
  description: "Customer's first name",
  actions: [
    {
      operation: "capitalize",
      mode: "foreground",
      label: "Capitalize All Values",
      description: "Capitalizes the values of the selected column",
    }
  ]
}
Listener Implementation
Next, create a listener to handle the job:ready event for your field action. Field actions use the sheet:operationName job pattern and provide field context through the job’s subject parameters.
listener.on(
  "job:ready",
  { job: "sheet:capitalize" },
  async (event) => {
    const { jobId, sheetId } = event.context;

    try {
      // Acknowledge the job start
      await api.jobs.ack(jobId, {
        info: "Starting job to capitalize all values",
        progress: 10,
      });

      // Get the field key from the job subject
      const { data: { subject } } = await api.jobs.get(jobId);
      const fieldKey = subject.params.columnKey;

      // Get all records from the sheet
      const { data: { records } } = await api.records.get(sheetId);

      await api.jobs.update(jobId, {
        info: "Capitalizing all values",
        progress: 20,
      });

      // Process records for the specific field
      const updatedRecords = [];
      records.forEach(record => {
        const value = record.values[fieldKey].value as string;
        if (value && value.length > 0) {
          const capitalizedValue = value.toUpperCase();
          if (value !== capitalizedValue) {
            record.values[fieldKey].value = capitalizedValue;
            updatedRecords.push(record);
          }
        }
      });

      await api.jobs.update(jobId, {
        info: "Updating records",
        progress: 60,
      });

      // Update only the modified records
      if (updatedRecords.length > 0) {
        await api.records.update(sheetId, updatedRecords);
      }

      await api.jobs.complete(jobId, {
        outcome: {
          message: `Successfully capitalized ${updatedRecords.length} values in the ${fieldKey} column.`,
        },
      });
    } catch (error) {
      console.error(error);
      await api.jobs.fail(jobId, {
        outcome: {
          message: "Failed to capitalize field values: " + error.message,
        },
      });
    }
  }
);
Key Differences from Other Action Types
Field actions have several unique characteristics:
- Job Pattern: Use
sheet:operationName
- Context Access: Field key is available via
job.subject.params.columnKey
- UI Location: Appear in column header dropdown menus
- Configuration: Defined within individual field objects in the Blueprint
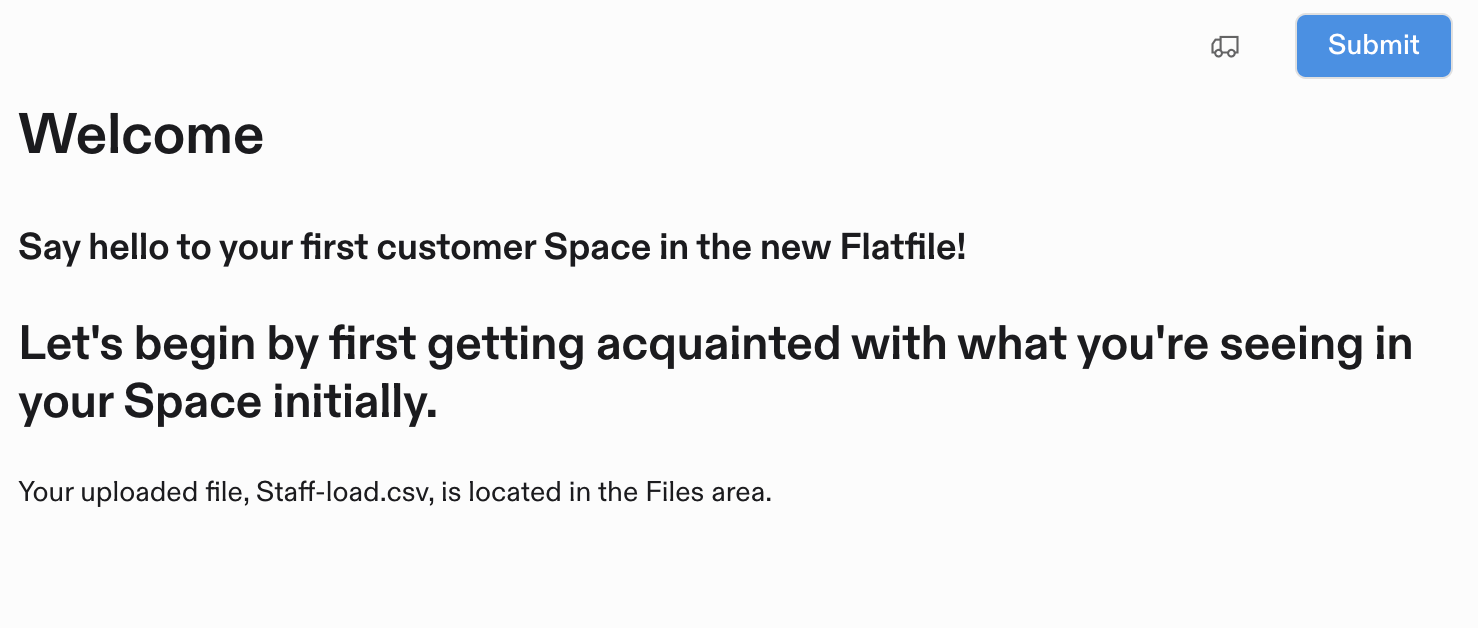
Document Actions
Document-mounted actions are similar to Workbook-mounted actions. They appear in the top right corner of your Document.
Usage
If you configure primary: true on an Action, it will be highlighted in the Document.
Document Configuration
Define Document-mounted Actions using the actions parameter when you create a Document.
import api from "@flatfile/api";

export default function flatfileEventListener(listener) {
  listener.on("file:created", async ({ context: { spaceId, fileId } }) => {
    const fileName = (await api.files.get(fileId)).data.name;
    const bodyText =
      "# Welcome\n" +
      "### Say hello to your first customer Space in the new Flatfile!\n" +
      "Let's begin by first getting acquainted with what you're seeing in your Space initially.\n" +
      "---\n" +
      `Your uploaded file, ${fileName}, is located in the Files area.`;

    const doc = await api.documents.create(spaceId, {
      title: "Getting Started",
      body: bodyText,
      actions: [
        {
          label: "Submit",
          operation: "contacts:submit",
          description: "Would you like to submit the contact data?",
          tooltip: "Submit the contact data",
          mode: "foreground",
          primary: true,
          confirm: true,
        },
      ],
    });
  });
}
Listener Implementation
In your listener, listen for the job’s event and perform your desired operations.
export default function flatfileEventListener(listener) {
  listener.on(
    "job:ready",
    { job: "document:contacts:submit" },
    async (event) => {
      const { context, payload } = event;
      const { jobId, workbookId } = context;

      try {
        await api.jobs.ack(jobId, {
          info: "Starting submit job...",
          progress: 10,
          estimatedCompletionAt: new Date("Tue Aug 23 2023 16:19:42 GMT-0700"),
        });

        // Do your work here

        await api.jobs.complete(jobId, {
          outcome: {
            message: `Submit job was completed succesfully.`,
          },
        });
      } catch (error) {
        console.log(`There was an error: ${JSON.stringify(error)}`);
        await api.jobs.fail(jobId, {
          outcome: {
            message: `This job failed.`,
          },
        });
      }
    }
  );
}
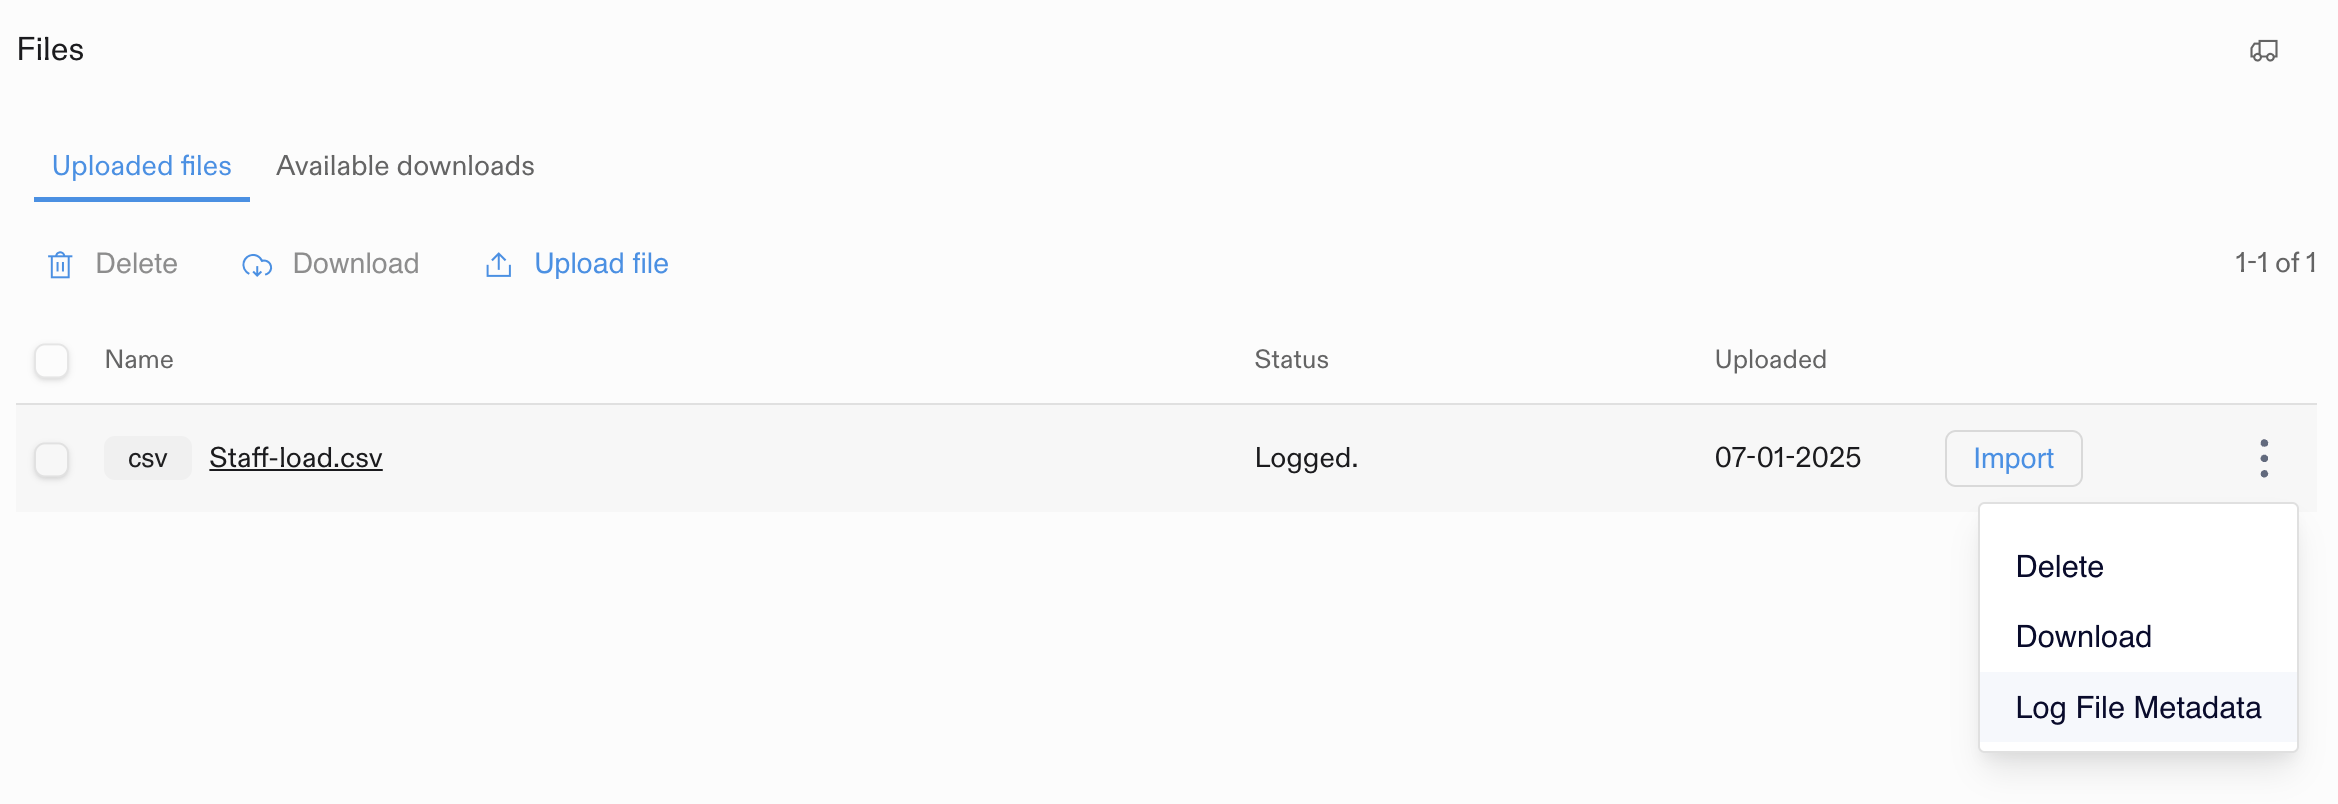
File Actions
Each file has built-in actions like Delete and Download.
File-mounted actions are represented as a dropdown menu for each file in the Files list. You can attach additional actions to a File.
Usage
You can attach additional actions to a File by listening for file events and updating the file’s actions array.
File Configuration
First, listen for a file:ready event and add one or more actions to the file.
listener.on("file:created", async ({ context: { fileId } }) => {
  const file = await api.files.get(fileId);
  const actions = file.data?.actions || [];
  const newActions = [
    ...actions,
    {
      operation: "logFileContents",
      label: "Log File Metadata",
      description: "This will log the file metadata.",
      primaty: true,
    }
  ];
  await api.files.update(fileId, {
    actions: newActions,
  });
});
Listener Implementation
Next, listen for job:ready and filter on the domain (file) and the operation of where the Action was placed. Be sure to complete the job when it’s done.
listener.on(
  "job:ready",
  { job: "file:logFileContents" },
  async ({ context: { fileId, jobId } }) => {
    try {
      await api.jobs.ack(jobId, {
        info: "Getting started.",
        progress: 10,
        estimatedCompletionAt: new Date(Date.now() + 10000),
      });

      const file = await api.files.get(fileId);
      console.log({ file });

      await api.jobs.update(jobId, {
        info: "Logged.",
        progress: 90,
        estimatedCompletionAt: new Date(Date.now() + 10000),
      });


      await api.jobs.complete(jobId, {
        outcome: {
          message: "Logging file contents is complete.",
        },
      });
    } catch (error) {
      await api.jobs.fail(jobId, {
        outcome: {
          message: "Logging file contents failed: " + error.message,
        },
      });
    }

  }
);
Action Parameters
Required Parameters
| Parameter | Type | Description |
|---|
operation | string | A unique identifier for the Action that is used by the listener to determine what work to do as part of the resulting Job. |
label | string | The text that will be displayed to the user in the UI as a button or menu item. |
Optional Parameters
| Parameter | Type | Default | Description |
|---|
primary | boolean | false | Whether the Action is a primary Action for the resource. Primary Actions are displayed more prominently in the UI. |
confirm | boolean | true | When set to true, a modal is shown to confirm the Action. |
description | string | - | The text displayed to the user when a confirmation modal is used. Phrase this as a question. |
icon | string | lightning bolt | The icon to be displayed. Use 'none' to omit the icon. See Flatfile icons for available options. |
tooltip | string | - | Text displayed as a tooltip when hovering over the action button or menu item. |
messages | array[{}] | - | Custom messages displayed as tooltips based on action state. Supports [{ type: 'error' }] and [{ type: 'info' }]. |
constraints | array[{}] | - | Conditions that disable the action. Options: hasAllValid, hasSelection, hasData. |
mode | string | background | Execution mode: foreground, background, or toolbarBlocking. |
Constraint Types
hasAllValid: Disables action when there are invalid recordshasSelection: Disables action when no records are selected (Sheet actions only)hasData: Disables action when there are no records
Mode Types
foreground: Prevents interacting with the entire resource until completebackground: Runs in the background without blocking the UItoolbarBlocking: Disables sheet-level toolbar and column header menus while allowing manual record entry
Usage
An Action with all of the above properties would look like this:
{
  operation: 'my-action',
  label: 'My Action',
  primary: true,
  confirm: true,
  description: 'Are you sure you want to run this action?',
  constraints: [{ type: 'hasAllValid' }, { type: 'hasSelection' }],
  mode: 'foreground'
  tooltip: 'Click to run action'
}
Configuration
| Parameter | Type | Required | Description |
|---|
type | string | ✓ | The type of the input form. Currently accepts: simple |
fields | array[object] | ✓ | An array of field objects representing the input form fields |
Fields
| Parameter | Type | Required | Description |
|---|
key | string | ✓ | The key for the field |
label | string | ✓ | The label for the field |
type | string | ✓ | Field type: string, textarea, number, boolean, or enum |
defaultValue | string | - | The default value for the field |
description | string | - | A description of the field |
config | object | - | Configuration options for the field (required for enum type) |
constraints | array[object] | - | An array of constraints for the field |
Config (for enum fields)
| Parameter | Type | Required | Description |
|---|
options | array[object] | ✓ | An array of options for the field |
Options
| Parameter | Type | Required | Description |
|---|
value | string | ✓ | The value or ID of the option |
label | string | - | A visual label for the option |
description | string | - | A short description of the option |
meta | object | - | An arbitrary JSON object associated with the option |
Field Constraints
| Parameter | Type | Required | Description |
|---|
type | string | ✓ | The type of constraint. Currently accepts: required |
Usage
First, configure your action to have an inputForm on your Blueprint. These will appear once the action button is clicked.
actions: [
  {
    operation: "submitActionFg",
    mode: "foreground",
    label: "Submit data elsewhere",
    type: "string",
    description: "Submit this data to a webhook.",
    primary: true,
    inputForm: {
      type: "simple",
      fields: [
        {
          key: "priority",
          label: "Priority level",
          description: "Set the priority level.",
          type: "enum",
          defaultValue: "80ce8718a21c",
          config: {
            options: [
              {
                value: "80ce8718a21c",
                label: "High Priority",
                description:
                  "Setting a value to High Priority means it will be prioritized over other values",
              },
            ],
          },
          constraints: [
            {
              type: "required",
            },
          ],
        },
      ],
    },
  },
];
job:ready and filter on the job you’d like to process. Grab the data entered in the form from the job itself and leverage it as required for your use case.
import api from "@flatfile/api";

export default async function (listener) {
  listener.on(
    "job:ready",
    { job: "workbook:actionWithInput" },
    async (event) => {
      const { jobId } = event.context;

      try {
        await api.jobs.ack(jobId, {
          info: "Acknowledging job",
          progress: 1,
        });

        // retrieve input
        const { data: job } = await api.jobs.get(jobId);
        const input = job.input;
        console.log({ input });

        // do something with input...

        await api.jobs.complete(jobId, {
          outcome: {
            message: "Action was successful",
          },
        });
        return;
      } catch (error) {
        console.error(error);
        await api.jobs.fail(jobId, {
          outcome: {
            message: "Action failed",
          },
        });
        return;
      }
    }
  );
}
Constraints
Usage
Workbook & Sheet Actions
- Adding a
hasAllValid constraint on an Action will disable a Workbook Action when there are invalid records.
- Adding a
hasData on an Action will disable a Workbook Action when there are no records.
actions: [
  {
    operation: 'submitActionFg',
    mode: 'foreground',
    label: 'Submit data elsewhere',
    description: 'Submit this data to a webhook.',
    primary: true,
    constraints: [{ type: 'hasAllValid'},{ type: 'hasData' }]
  },
  {...}
],
Sheet Actions Only
Adding a constraint of hasSelection on an Action will disable a Sheet Action when no records in the Sheet are selected.
sheets : [
  {
    name: "Sheet Name",
    actions: [
      {
        operation: 'duplicate',
        mode: 'background',
        label: 'Duplicate selected names',
        description: 'Duplicate names for selected rows',
        constraints: [{ type: 'hasSelection' }],
        primary: true,
      },
      {...}
    ]
  }
]
Messages
Add custom messages to actions, tailored according to their state:
These messages will be displayed as tooltips when users hover over an action, providing context-specific text that corresponds to the action’s current state. When an error message is present on an action, the action will be disabled.
Usage
Simply add a messages property to your action configuration. This property should be an array of objects, each specifying a message type and its content.
  actions: [
    {
      operation: 'duplicate',
      mode: 'background',
      label: 'Duplicate selected names',
      description: 'Duplicate names for selected rows',
      messages: [
        { type: 'error', content: 'This is an error message' },
      ],
      primary: true,
    },
    {...}
  ]