Overview

This guide is designed to teach you about and use the new Platform syntax. We’ve also created a V2 Shim package to help expedite your upgrade. You can check out the quickstart guide that uses the shim to cut down your time to upgrade.

As you transition from Portal 2.0 to Platform, you’ll come across many familiar elements that resemble what you’ve known. However, there might be instances where certain components are no longer present, have been rearranged, or sport a fresh appearance. To ensure a seamless transition, this guide is designed to teach you those differences and how to convert. It will highlight both the similarities and differences between the two versions, enabling you to switch over with minimal effort. Want to see what it might look like to upgrade? Check out our upgrade repository here to compare the beginning and end of upgrading.

A comparison

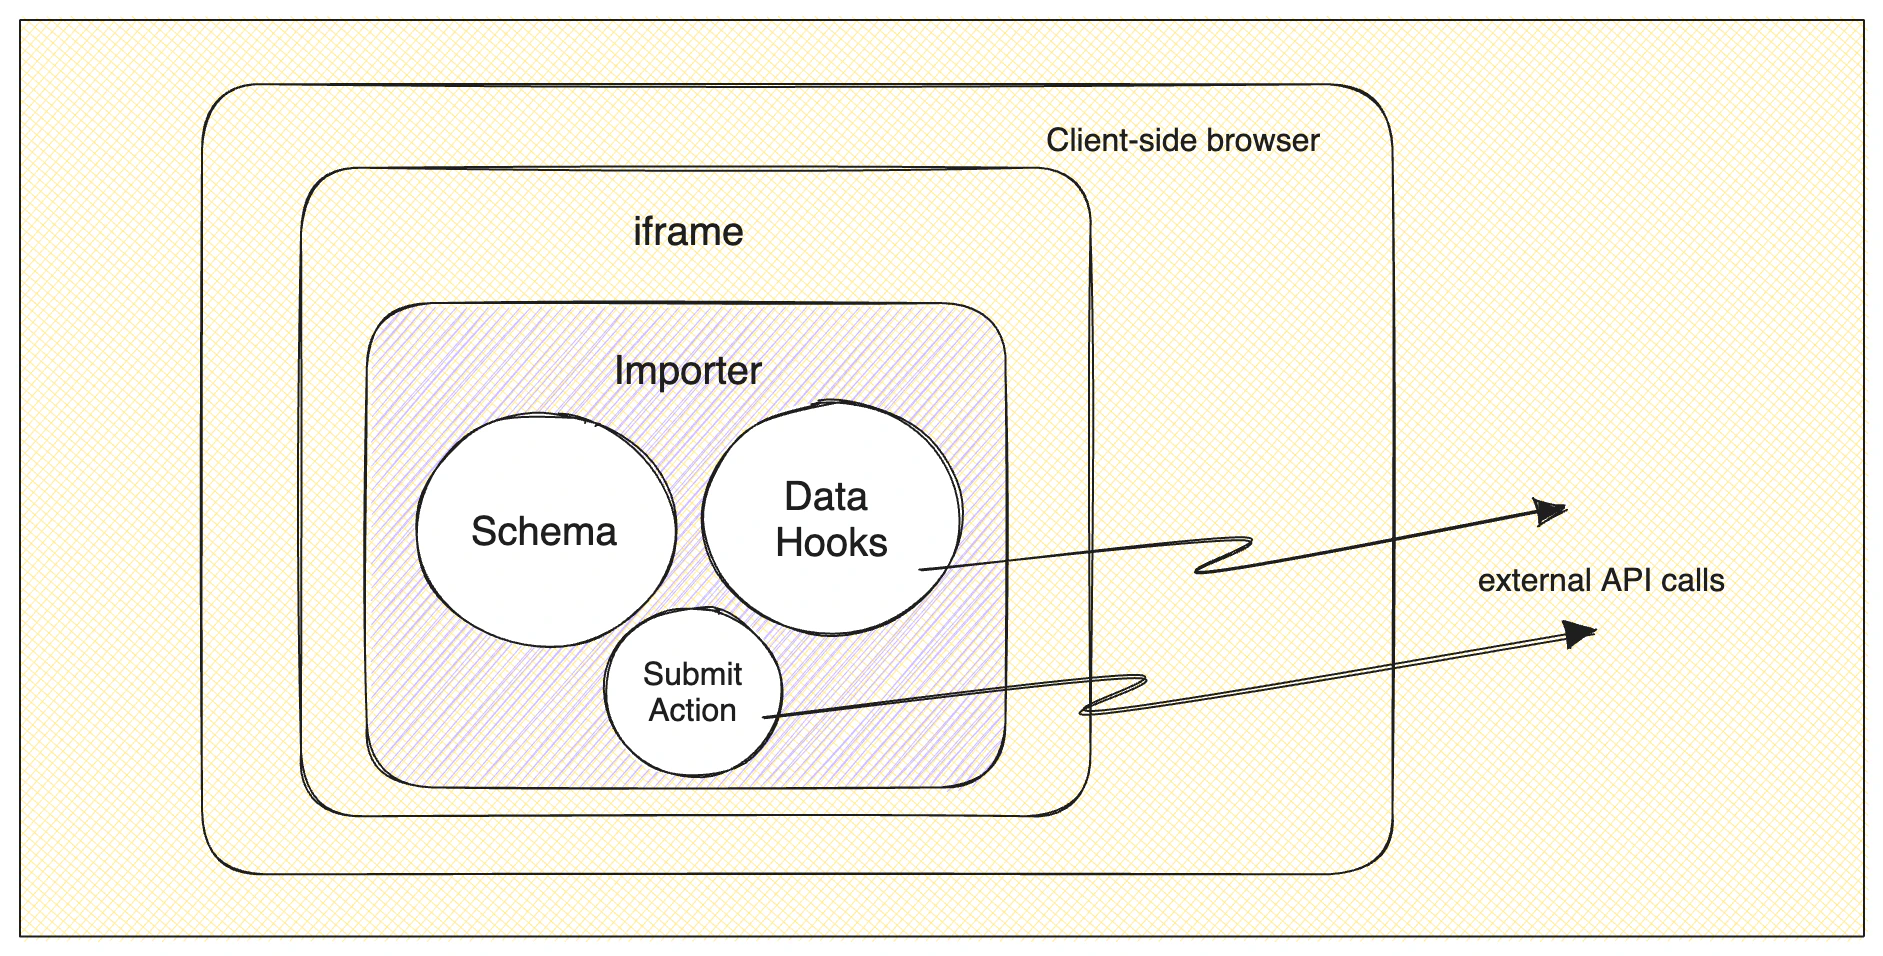
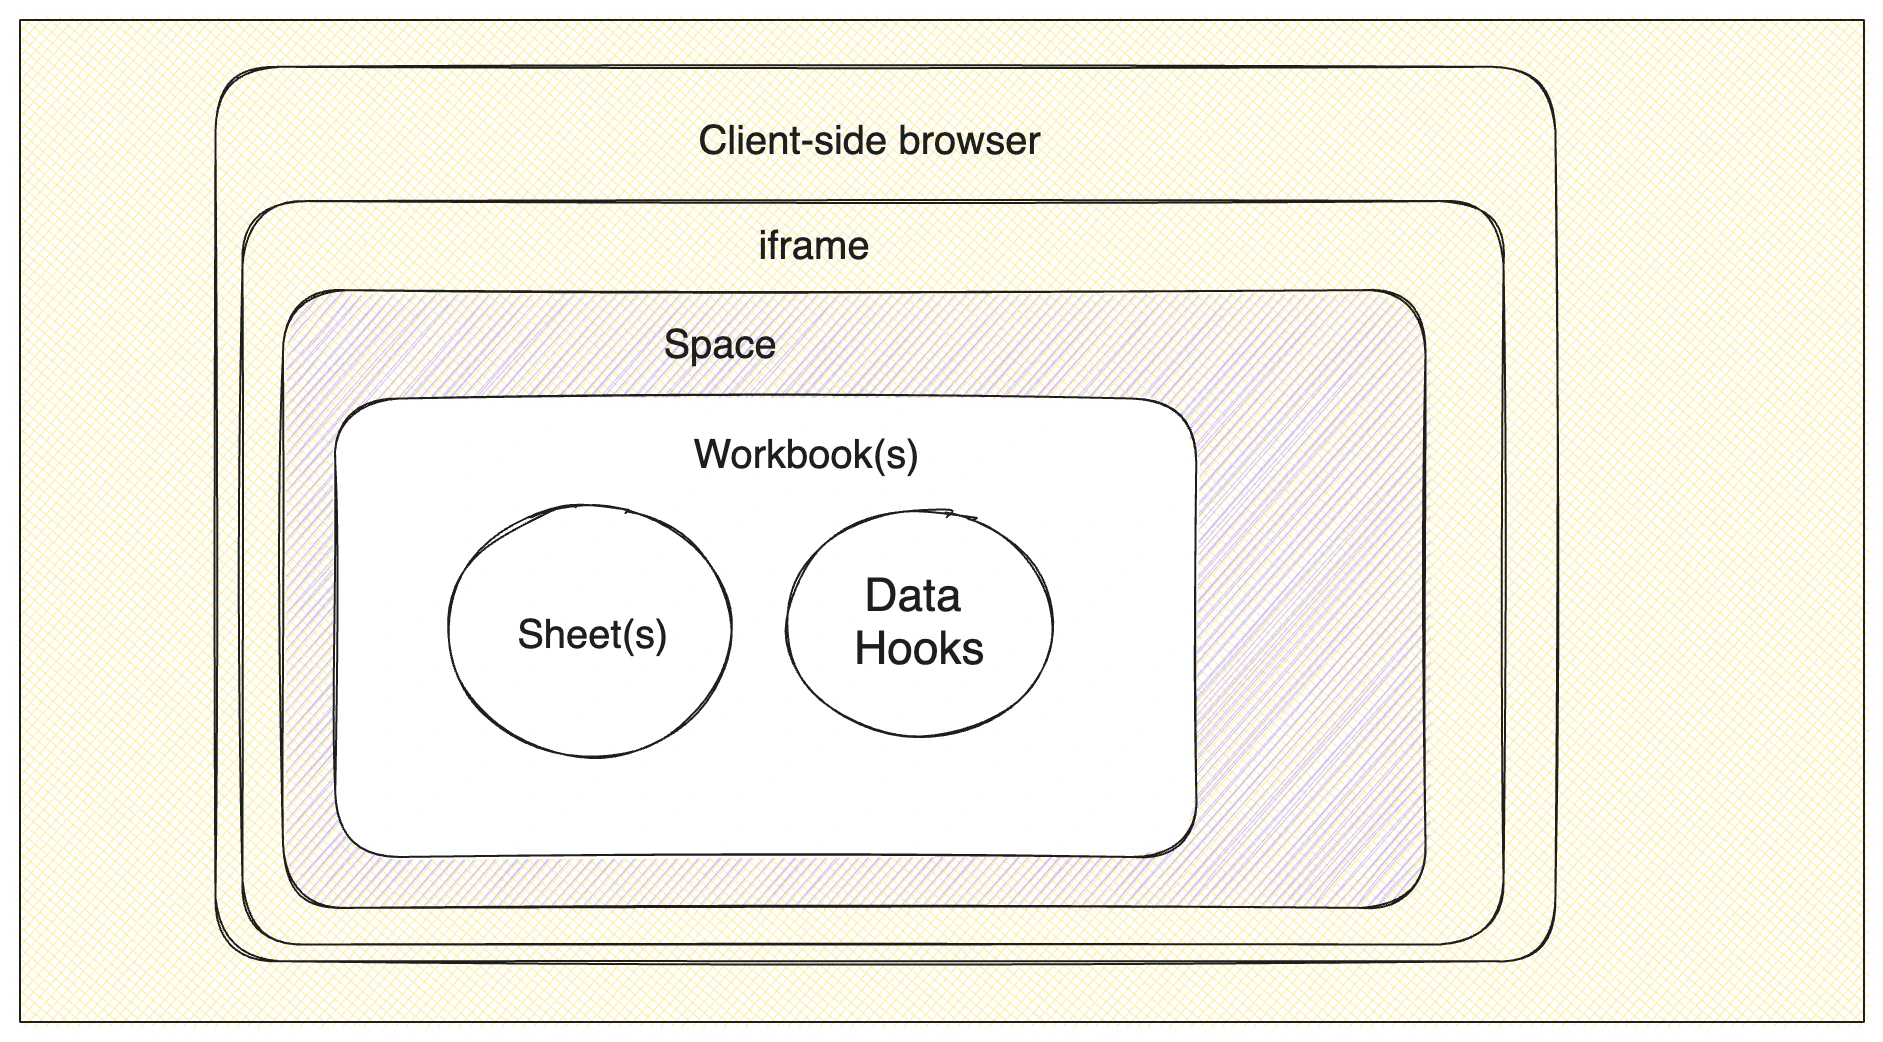
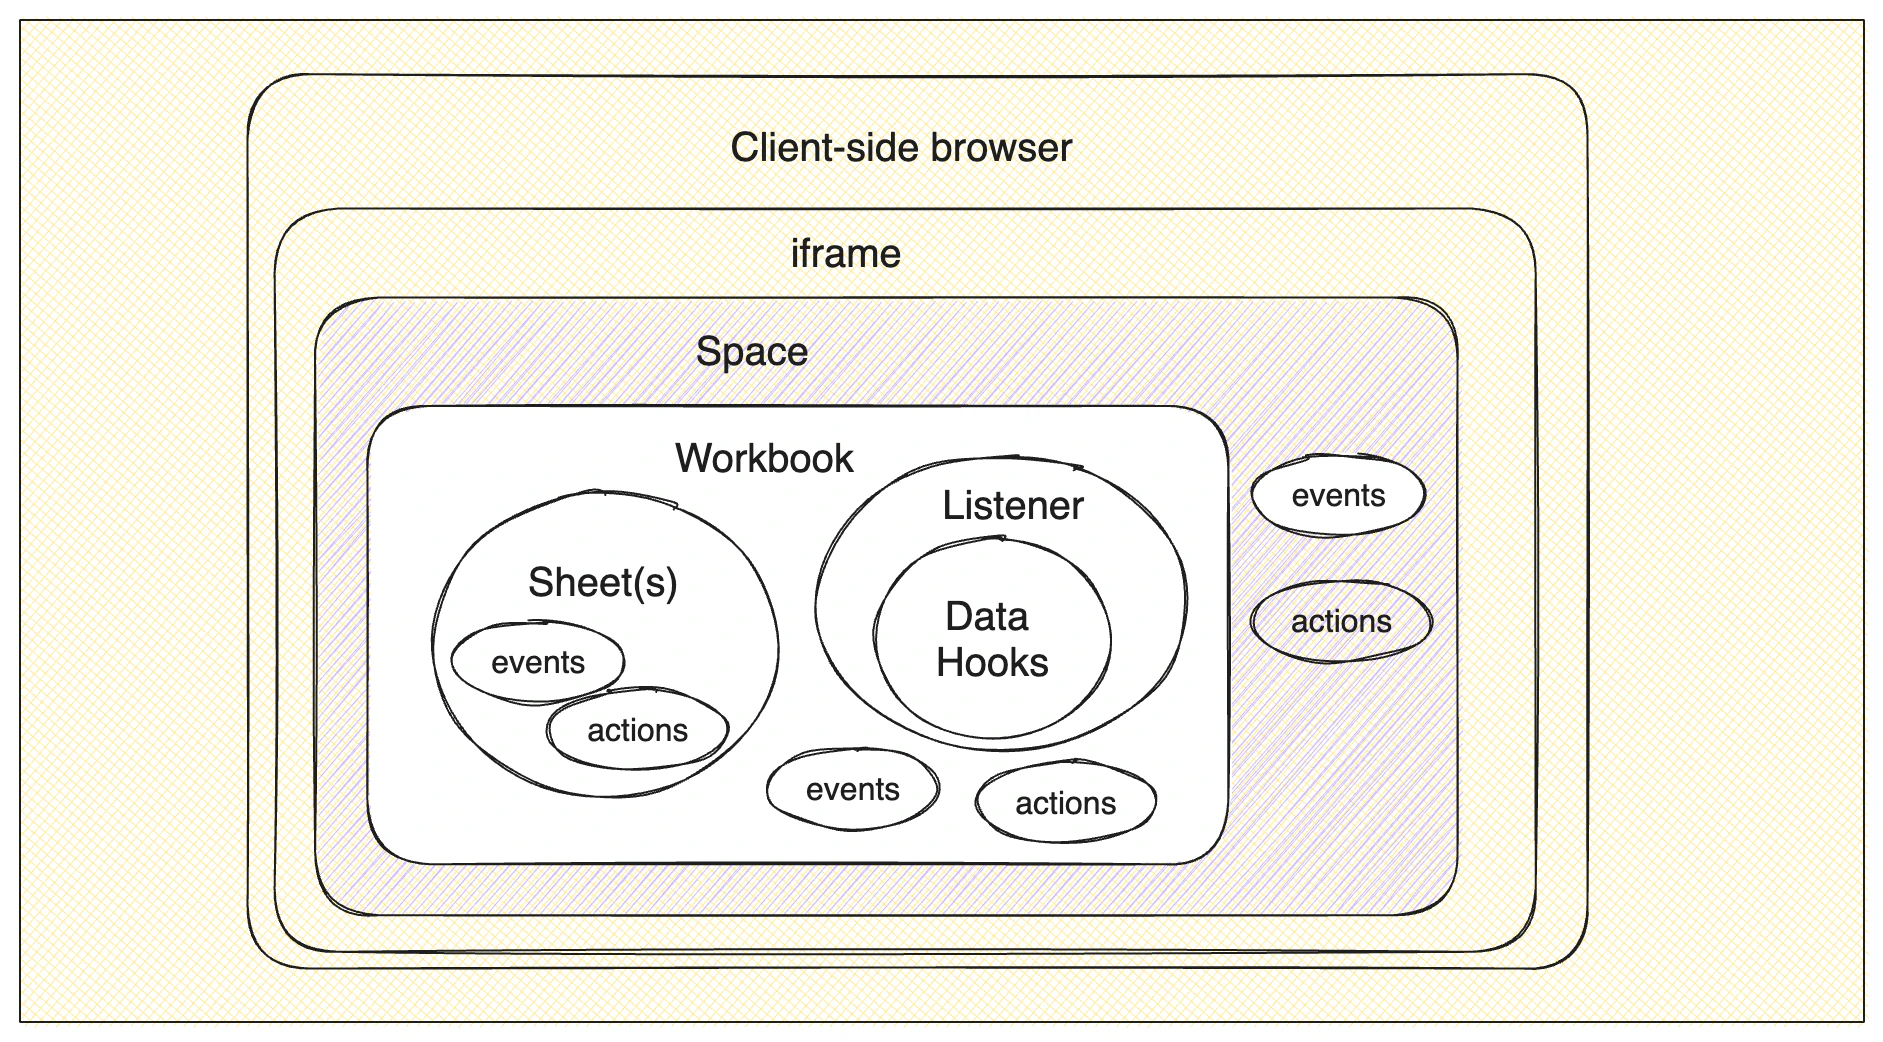
Explore this illustrative diagram that lays out the distinctions between the two products. While Platform introduces a range of additional and novel concepts compared to Portal, rest assured, you’re not obligated to embrace every new element to transition your existing importer to Platform. Flexibility remains key in making the switch.

Review V2 Portal

v2 Portal

Meet the Platform

v2 Portal

Before you begin

Core Architecture

Meet the Environment

In Portal, setting devMode: true flagged imports as “dev” imports, but in Platform, there are true Environments.

You can have many custom Environments, but upon signup, you will have a Development, Production, and Demo Environment configured.

All of the other entities (like Spaces, Workbooks, and Sheets) will live in those Environments.

Meet the Space

A Space and its UI constitute the new data importer that has replaced Portal. The Space is what holds all the Files and Workbooks that are needed to import data. You can learn more about Spaces and all that they do in our Spaces documentation.

Meet the Workbook

For Platform, it’s a good idea to get to know the concept of a Workbook. When you’re upgrading, you can think of a Workbook as the place where your import data hangs out.

Unlike Portal, where all the editing and fixing of data happens right in the browser, Platform also has an option to perform these actions on the server side. The data gets saved in one or more Workbooks as you go along.

Inside these Workbooks, you’ll find one or more Sheets, which are similar to schemas in Portal. Other than some basic names and settings, the sheet has something called a “fields array,” which is pretty similar to what you know from Portal.

Keep in mind that if you had multiple importers to handle different data sets from different places, you will be able to consolidate them by having all your schemas now live in one Workbook.

Configuring your schema

Meet the Blueprint

Back in Portal, when you received diverse data from the same users and wished to merge it afterward, you had to establish distinct Portal configurations and display the appropriate one for each file. However, leveraging Blueprints offers a more streamlined approach. You can employ a collection of Sheets (akin to the schemas you constructed in Portal) within a Workbook. This simplifies the process of centralizing all your data structures and collating the information cohesively. The added advantage is that you’re no longer burdened with managing multiple uploads from various schemas.

Blueprint Example
{
  "sheets": [
    {
      "name": "products",
      "slug": "products",
      "readOnly": false,
      "allowAdditionalFields": false,
      "access": ["add", "edit"],
      "fields": [
        {
          "key": "code",
          "label": "Product Code",
          "type": "string"
        },
        {
          "key": "description",
          "type": "string"
        },
        {
          "key": "price",
          "type": "number"
        }
      ],
      "actions": [],
      "metadata": {}
    },
    {
      "key": "manufacturers",
      "label": "Product Manufacturers",
      "description": "A list of maunfacturers for the products",
      "fields": [
        {
          "key": "manufacturer_code",
          "label": "Manufacturer Code",
          "type": "string"
        },
        {
          "key": "manufacturer_name",
          "label": "Manufacturer Name",
          "type": "string"
        }
      ]
    }
  ]
}

Full Platform diagram

v2 Portal

Upgrade your importer

Now we will do a side-by-side look at how we will go about upgrading your importer. This guide will show some simple snippets that will compare the different parts and how they are converted. You can follow along with the full example in our Upgrade Repo.

1. Update your Flatfile button

The skeleton of your application should remain mostly the same. You’ll see here that we can use the same updated UI element when integrating Platform.

<input
    type="button"
    id="launch"
    value="Import Contacts"
/>

2. Initialize Flatfile

const { contactSchema } = schemas;

const importer = new FlatfileImporter(
    "YOUR_LICENSE_KEY",
    contactSchema
);

$("#launch").click(function () {
    importer
        .requestDataFromUser()
        .then(function (results) {
            importer.displaySuccess("Thanks for your data.");
            $("#raw_output").text(JSON.stringify(results.data, " ", 2));
        })
        .catch(function (error) {
            console.info(error || "window close");
        });
});

3. Build a Workbook

This is where you will convert your Schema(s) into a Workbook. This is the point where you can combine multiple importers into one by having multiple Sheets on the Workbook. Your end users would then be able to select which data model they are uploading into during the import process.

Compare and contrast

The workbook consists of three crucial components: the name and the sheets properties.

Sheets will share many properties with those found in the Portal schema. You’ll encounter a name property (akin to the type property in a Portal schema) and fields (which closely resembles your Portal fields array).

When it comes to the fields array, you’ll find quite a few familiar elements like key, label, and description, which all transition directly from Portal.

About field types

Let’s delve deeper into the Portal and Platform type property for fields. When you don’t specify this field, both Portal and Platform will assume a default string type. In Portal, the type: "checkbox" is now "type": "boolean", and the type: "select" is now "type": "enum" in Platform.

Furthermore, keep in mind that while Portal only had three types, Platform has broadened its range to include number, date, and reference types. To get more details about these new field types, you can check out our documentation. Also, we’ve prepared a handy reference table below, outlining all the new types and how they were handled in Portal.

Portal TypePlatform Type
StringString
StringDate
StringNumber
SelectEnum
CheckboxBoolean
N/AReference

When providing select/enum options there is still an options array that has the same structure as it did in Portal. However, one thing to note is that this options array has been moved into a new property on the field object named config for Platform.

{
    label: "Deal Status",
    key: "type",
    type: "select",
    options: [
        { label: "New", value: "new" },
        { label: "Interested", value: "interested" },
        { label: "Meeting", value: "meeting" },
        { label: "Opportunity", value: "opportunity" },
        { label: "Not a fit", value: "unqualified" }
    ],
    validators: [{ validate: "required" }]
}

Set up validations

The final aspect of converting your Portal fields into Platform fields will be to handle the validators from Portal. While Portal offered many different kinds of validators, only two have been converted in the fields themselves, and those are required and unique. All other validations can still be handled, but are now handled in code instead of a setting. Check out the other validators section for examples.

The validators property will now be called constraints which is still an array of objects. The object for each validator has traded in the validate property for a type property, but the unique and required values remain the same.

const schemas = {
    contactSchema: {
        fields: [
            {
                label: "First Name",
                key: "firstName",
                description: "First or full name",
                validators: [{ validate: "required" }]
            },
            {
                label: "Last Name",
                key: "lastName",
            },
            {
                label: "Email Address",
                key: "email",
                description: "Please please enter your email",
                sizeHint: 1.5,
                validators: [
                    { validate: "unique" },
                    {
                        validate: "regex_matches",
                        regex:
                        "(?:[a-z0-9!#$%&'*+/=?^_`{|}~-]+(?:\\.[a-z0-9!#$%&'*+/=?^_`{|}~-]+)*|\"(?:[\\x01-\\x08\\x0b\\x0c\\x0e-\\x1f\\x21\\x23-\\x5b\\x5d-\\x7f]|\\\\[\\x01-\\x09\\x0b\\x0c\\x0e-\\x7f])*\")@(?:(?:[a-z0-9](?:[a-z0-9-]*[a-z0-9])?\\.)+[a-z0-9](?:[a-z0-9-]*[a-z0-9])?|\\[(?:(?:25[0-5]|2[0-4][0-9]|[01]?[0-9][0-9]?)\\.){3}(?:25[0-5]|2[0-4][0-9]|[01]?[0-9][0-9]?|[a-z0-9-]*[a-z0-9]:(?:[\\x01-\\x08\\x0b\\x0c\\x0e-\\x1f\\x21-\\x5a\\x53-\\x7f]|\\\\[\\x01-\\x09\\x0b\\x0c\\x0e-\\x7f])+)\\])",
                        error: "Must be a valid email address."
                    }
                ]
            },
            {
                label: "Phone Number",
                key: "phone"
            },
            {
                label: "Date",
                key: "date"
            },
            {
                label: "Country",
                key: "country"
            },
            {
                label: "Zip Code",
                key: "zipCode"
            },
            {
                label: "Subscriber?",
                key: "subscriber",
                sizeHint: 0.5,
                type: "checkbox",
                validators: [
                    {
                        validate: "regex_matches",
                        regex: "^$|^(1|0|yes|no|true|false|on|off)$",
                        regexFlags: { ignoreCase: true }
                    }
                ]
            },
            {
                label: "Deal Status",
                key: "type",
                type: "select",
                options: [
                    { label: "New", value: "new" },
                    { label: "Interested", value: "interested" },
                    { label: "Meeting", value: "meeting" },
                    { label: "Opportunity", value: "opportunity" },
                    { label: "Not a fit", value: "unqualified" }
                ],
                validators: [{ validate: "required" }]
            }
        ],
        type: "Contacts",
        managed: true
    }
};

4. Transform Data

Coming from Portal, you are likely familiar with the concept of Data Hooks. The same sort of functionality can be obtained in Platform, but they have moved into Listeners and use plugins like the record hook plugin. You can read more about Listeners here and more about all of our Plugins here.

importer.registerRecordHook(async (record, index) => {
    let out = {};

    if (record.email) {
        if (record.email.includes('flatfile.io')) {
            out.email = {
                info: [
                    {
                        message: "Flatfile emails should use flatfile.com ending only",
                        level: "error"
                    }
                ]
            }
        }
    }

    if (!record.phone && !record.email) {
        out.phone = out.email = {
            info: [
                {
                    message: "Please include one of either Phone or Email.",
                    level: "warning"
                }
            ]
        };
    }

    if (record.phone) {
        let validPhone = formatPhoneNumber(record.phone);
        if (validPhone !== "Invalid phone number") {
            out.phone = {
                value: validPhone,
                info: []
            };
        } else {
            out.phone = {
                info: [
                    {
                        message: "This does not appear to be a valid phone number",
                        level: "error"
                    }
                ]
            };
        }
    }

    if (record.date) {
    //reformat the date to ISO format
        let thisDate = format(new Date(record.date), "yyyy-MM-dd");
    //create var that holds the date value of the reformatted date as
    //thisDate is only a string
        let realDate = parseISO(thisDate);
        if (isDate(realDate)) {
            out.date = {
            value: thisDate,
            info: isFuture(realDate) ?
                [
                    {
                        message: "Date cannot be in the future.",
                        level: "error"
                    }
                ]
                : []
            };
        } else {
            out.date = {
                info: [
                    {
                        message: "Please check that the date is formatted YYYY-MM-DD.",
                        level: "error"
                    }
                ]
            };
        }
    }

    //country name lookup, replace with country code
    if (record.country) {
        if (!countries.find((c) => c.code === record.country)) {
            const suggestion = countries.find(
                (c) => c.name.toLowerCase().indexOf(record.country.toLowerCase()) !== -1
            );
            out.country = {
                value: suggestion ? suggestion.code : record.country,
                info: !suggestion ?
                    [
                        {
                            message: "Country code is not valid",
                            level: "error"
                        }
                    ]
                    : []
            };
        }
    }
    if (
    record.zipCode &&
    record.zipCode.length < 5 &&
    (record.country === "US" || out.country.value === "US")
    ) {
        out.zipCode = {
            value: record.zipCode.padStart(5, "0"),
            info: [{ message: "Zipcode was padded with zeroes", level: "info" }]
        };
    }

    return out;
});

Other Validators

In the set up validations section above, we talked about converting the required and unique validators, but validators like regex or required_with are now handled in code in a Listener.

Regex Validation Example:

fields: [
    {
        label: "Company Code",
        key: "companyCode",
        validators: [{ validate: 'regex_matches', regex: '^[a-zA-Z0-9]*$' }]
    },
]

required_with Validation Example:

fields: [
    {
        key: "city",
        label: "City",
    },
    {
        key: "state",
        label: "State",
        validators: [
            {
                validate: "required_with",
                fields: ["city"],
            },
        ],
    },
]

5. Match your brand

Custom theming in Portal was a crucial part of making the importer like a part of your application. Platform also has custom theming that you can use to do the same. Check out our theming guide to see what all is configurable in Platform.

6. Set the destination

In Portal, you were able to specify a webhook endpoint using webhookUrl -OR- use the returned data within the Promise to do whatever needed to be done with your data. With Platform, we use the Listeners to wait for the submit action to happen and then act on it.

$("#launch").click(function () {
    importer
        .requestDataFromUser()
        .then(function (results) {
            importer.displaySuccess("Thanks for your data.");
            $("#raw_output").text(JSON.stringify(results.data, " ", 2));
        })
        .catch(function (error) {
            console.info(error || "window close");
        });
});

7. Customize

While everything above gives you all sort of great information about how your Portal implementation will convert to Platform, it’s just the beginning of all the amazing new things you can do with the Platform. Below we are going to share some links that can help make your already great workflow even better.